Set your machine. This is what mine was set to throughout the whole project.
- Match the correct thread colour
- Tension 3
- Stitch A
- Spacing 2
Adding in the pleats
 Ok, I forgot about adding these in before doing the collar so I suggest if you want them further apart then do this bit before the sewing the collar in place. When I pinned the two pleats in place, I had to go with them being closer to the buttons because of the collar curve being much straighter than it would be if I had done them towards the shoulder a little more.
As you can see these pins were not straight. I didn't measure. tut tut! Instead because of the pinstripes I chose to make sure the pattern of the pins stripes matched. I only made the pleast down to the third button as that is where the soft part of the collar will be attached. I did also stitch too far down on one side.
So I do believe I stitched these in unevenly in both length and distance from centre. Notes to remember.
- Measure and make sure pleats are symmetrical
- Using a pin, mark where you would like to finish stitching. This was a good tip that I recently read on Tilly's blog when stitching darts.
Sleeves


Preparing the collar
I folded the soft collar in half and cut it in the middle for equal parts.

I then stitched a seam around the edge.

BUT, I didn't press it before doing so, so it was out of line and uneven (I had to hand sew a little bit in the back so that it wouldn't show on the front.

Both collars should be prepared ready for the next step.
Taking in the sides
So I decided to take in the sides just a little and I don't think I should have. So you can skip this part if you like.
Using the soft part of the collar, I pinned it where I thought it should be sewn in. I planned on taking the sides in a little and embedding the end of the collar into the seam.


Using the form, I pinned the sides in and repinned and then repinned again what I thought would be a good fit. The form is a little bigger on the tummy than I generally am because I made after eating lunch.
This was my first attempt. It didn't leave much room for any gathered pleats.
I then pinned in place what I was comfortable with.

I then pressed a fold where I wanted to take in the shirt. I straight stitched down that line.

This is how it turned out. I unsure why it gathered a little, it wasn't as neat as I wanted it to. Anyone care to enlighten me?
Did the tension need adjusting? of was it catching underneath without me realising?

This is one of the finished sides

It didn't feel like I had taken it in that much and when I attached the hard part of the collar on the back, I hadn't realised that there was not going to be enough fabric for gathering.

So now that I had done that, I needed to prepare the hard collar ready for attaching. Now I think I made this a lot harder than I needed to.
This step can be shortened and you need not do what I had done.
Adding the hard collar


It was rather a lot of bagginess.
I pinned the sides of the hard collar in place and was presented with lots of shirt with no idea how to attach it so that it looked neat. That bagginess, weellll, I decided to hide it behind the hard collar.
Look below.

I tucked the excess underneath the collar and folded the shirt collar underneath also, so that only the top half was available to me to work with. I started to pin the excess in place to sew and then realised I was going to need some folds (which she had in the original anyway). So I measured the centre.

I then went two inches either side of the centre and made a fold of half and inch (so it 1 inch each side).

I had to repin in the correct place ready to sew, this was inbetwwen the shirt and the shirt collar. So this is what it looked like when I was ready to sew it in place. The excess was pinned hidden and the folds were in place. I stitched a long the seam that was already there. Reinforcement I suppose and neatness - that would have been a pain had I have had to restitch!


This is what the shirt looked like once stitched into place.
Almost finished the shirt!
Gathering
The picture for some reason will not turn around. So I'll come back to make that look better later. For now though here it is. As I gathered I pinned into place. I started of pinning every bit of gather but rapidly ran out of pins, so I had gather but pin a few at a time.

Once pinned, I stitched into place. Now had I not have taken in the sides, my gathers would have been much better and noticeable. On the other hand though, I think it suits the petiteness of my body shape.


Ok!
So the last bit!
The Sleeves

Cut the cuffs to a more lady like width. I went by the pinstripe again as it was the same on both cuffs! I stitched down one side on the seam that was already there.
I then slid the right sides together (new term I've recently got the hang of). This means to lay the side that is going to show against the side that is going to show, so that once it is folded out you won't see the seam. See below.

I made a few pleats and lined them up each side of the cuff so that they were symmetrical. I then stitched in place a half inch seam.

Do this on both arms.
Then you are all finished! It is generally quite a quick and easy project if you plan BEFORE hand and not as you go!
So notes to remember:
- Measure and make sure pleats are symmetrical
- Using a pin, mark where you would like to finish stitching. This was a good tip that I recently read on Tilly's blog when stitching darts.
- Press, press and press... with an iron of course! Especially with those collars.
- Do not reduce the width of the sleeve unless you really have to (this causes problems with taking in the shirt)
- You do not need to take in the shirt either if you want bigger pleats.
- More folds could have probably been a better solution to the bagginess in the back of the shirt.
- Gathering, make sure you have enough pins OR use them wisely, hehe.
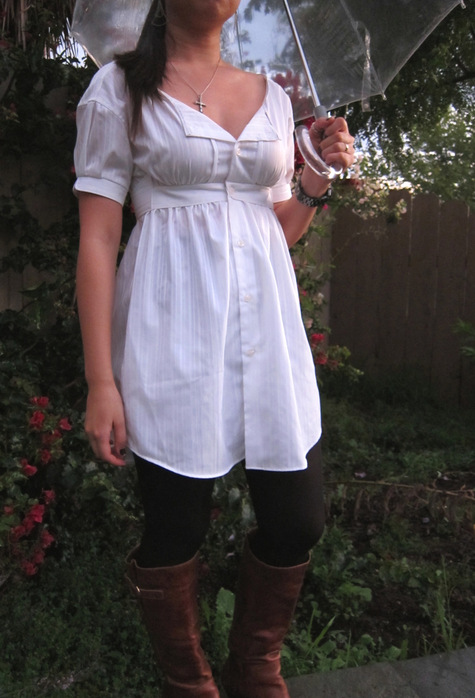
Then I actually got round to wearing it a few days later and I was chuffed. I hid the mishaps well. No-one need notice! It was comfortable but yes I did indeed need a jumper over the top. I was only able to wear it like this for the pictures because the logburner was on! I cannot wait for warmer weather though!
.png)
I have attached the instructions in short to burdastyle.
I'm going to be checking in soon with my next project the Sorbetto Tank Top
I'm quite excited about this one because I have had to make some adjustments to the pattern.
I look forward to sharing it with you.
x Lily x